
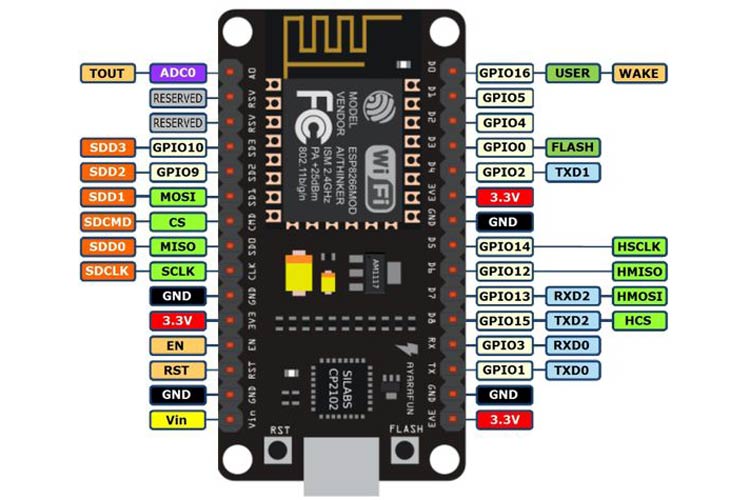
NodeMCU with WiFi (CP2102)
R86.25 incl. vat
NodeMCU ESP8266 IoT with WiFi (CP2102 UART)
Internet of Things Development Board
An open-source firmware and development kit that helps you to prototype your IoT product within a few Lua script lines.
NodeMcu is an open source IoT platform. It includes firmware which runs on the ESP8266 Wi-Fi SoC from Espressif Systems, and hardware which is based on the ESP-12 module. The term “NodeMCU” by default refers to the firmware rather than the dev kits. The firmware uses the Lua scripting language. It is based on the eLua project and built on the Espressif Non-OS SDK for ESP8266.
Built-in on-board USB-TTL serial converter based on CP2102, with Micro-USB socket
Power in for DC 4~9V DC to pin VIN
Pin headers 2.54mm (0.1″) 15 pins x 2 rows
Pin row spacing of 0.9″ (22.86mm)
Arduino-like hardware I/O and can program in Arduino IDE
Event-driven API for network applications
10 GPIOs D0-D10, PWM functionality, IIC and SPI communication, 1-Wire and ADC A0 etc. all in one board
Wifi networking (can be used as an access point and/or station, host a web server), connect to the internet to fetch or upload data
The board combines features of WiFi access point and station plus microcontroller and uses simple Lua based programming language.
Arduino-like hardware IO
Advanced API for hardware IO, which can dramatically reduce the redundant work for configuring and manipulating hardware. Code like Arduino, but interactively in Lua script.
Nodejs style network API
Event-driven API for network applications, which facilitates developers writing code running on a 5mm*5mm sized MCU in Nodejs style. Greatly speed up your IoT application developing process.
Lowest cost WI-FI
WI-FI MCU ESP8266 integrated and easy to prototyping development kit. The best platform for IoT application development at the lowest cost.
Usage Notes:
The ESP8266 uses a lot of current, so if you’re getting flakey behavior make sure you are plugging your console cable into either a motherboard USB port or a powered USB hub. Don’t use the ‘extra’ USB port on your monitor or keyboard.
Related Products
MEGA Sensor Shield V1
R125.30 incl. vat

Piezo Electronic Buzzer Alarm 95DB W/Wires 3-24VDc
R9.09 incl. vat
Keyestudio Passive Buzzer module
R45.75 incl. vat
Keyestudio White LED Module
R45.75 incl. vat